Showing posts with label sew. Show all posts

09 October 2012

You Can Make This Quilt

Another quilt post. Sorry. I'm kind of on a roll here.

This one was for my brother's baby boy, due in November. Have I mentioned how fun baby quilts are? They're so fast. No pieced back. No pieced batting. It's lovely. I whipped this one out in two or three days I think.

I found the idea for this one on a favorite blog I follow. It's called a "Strip and Flip" quilt because as you can see, you just piece the strips together and when you are done, you cut out that middle section and flip it, and put it back together. That's it. The best part is that you only need tiny little strips of your 44" wide fabric to make it work. If you're a beginner quilter, this would be a great project for you.

 New wavy line quilting method. You can do this with your normal foot. No need for any fancy quilting stuff. No need to be perfect either. Oh, and almost all the fabric is from Walmart (shhh....don't tell).

 Striped binding.
Again, I'm addicted.

 My very manly husband says the back is borderline girly. I think it's just boy enough.
(Sidenote: quilt+barbed wire = a tricky situation. Very tricky indeed)

Likey.

07 August 2012

Twinner Quilts

These babies have been in the line up for a while now. A friend of mine paid me to make her twin  12 year old granddaughters quilts. The girls picked the color scheme, but I did everything else. I thought it would be fun to use the same color scheme and squares, but two do different patterns. I think they turned out super cute. They are lap size. About 48x58".

 Inspiration from my sister in law, here.

I could have quilted them tighter, but they stay softer this way. The squares were 4" finished, I think. That's a lot of triangles--572 to be exact. 

I found an amazing tutorial online of how to make these Half Square Triangles. Usually people cut out one square, and draw a line diagonally from corner to corner, then sew on either side of the line. This method is different, and much faster. Check out the video here, it's worth your time.

I'm not a huge purple fan, as in there isn't one speck in my stash, so this color scheme was outside my comfort zone. The backing is the same on both. Some people don't like the scrappy strip, but I do.

I entered this one into the county fair (the other one wasn't quite done yet). It's always fun to have your work judged. The best part is when you drop it off and the older ladies squeal in delight because they're so tickled to see a young girl like me quilting.

My score sheets were all over the place, from a 65 to an 85. They said my corners didn't come to 90 degrees and that my binding was "too full". I never knew that was an issue. Good to learn for next time, even if I was 3 points off of a blue ribbon :) 

Now, on to start another quilt!

13 May 2011

Pin Cushion Tutorial

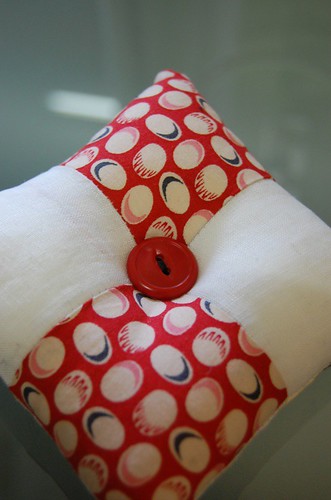
So, I have one of those HARD tomato-like pin cushions and I hate it. It not soft and the pins won't stick in very easily if I just use one hand so I have been wanting to make a new one. Found this tutorial and thought it was so super cute....
Finished Pincushion
Here's the tutorial....tutorial

Easy peasy!
Oh, and I have few projects I have done but we lost our camera so I haven't been able to take pics and post them. Not a good thing to lose the camera as an avid blogger....

10 April 2011

Bowtie


I am dieing over here. Look how cute this kid is with a bowtie.

The tutorial here.

03 April 2011

Placemat

I thought this was soooo adorable and it looked like something you girls on this blog would like to make so I had to share. Tutorial here.


Perfect for the kiddos!

18 January 2011

EASY Double-Sided Table Runner

I wanted to make something like this for Thanksgiving and Christmas but never got around to it. I went to Joann's today and their holiday fabric was on sale and it was soooo cute so I had to jump on it.

I'm not the biggest decorator for St. Patrick's Day so I decided to do a Valentine/Easter table runner.
It cost about $5 and only took about 15 minutes...and I love it. Perfect!

This is really so simple, you guys. 

Here's how:
Get 3/8 a yard of 2 fabrics of your choice. You can do this any fabric, doesn't have to be holiday but it makes it more fun because you get two out of one! Then take the fabric and iron it and pin it together as best you can with right sides out, don't worry if there is excess fabric and the sides aren't even because you are going to give it a thick 1 inch seem. After you sew it cut off the excess fabric trying to make it even all around and so there is about 1/4 of an inch seem, then snip around the edges and wash to give it a fraded edge-get it? Super easy! That's it!

Final Product!


Here's the edging---hopefully this helps explain it better.

 The otherside---Easter! Loved that fabric and the best part, the both are glittered a little bit, so fun!

I got a few more Valentine crafts to post so stay tuned! :)

18 October 2010

Raccoon!

I decided that the critters on the back of my capes are too cute to be cooped up in a dress-up box. (what?)

This is a baby shower gift for a friend of mine. After appliqueing the crazy raccoon using zig-zag stitch, I tacked it on to a canvas. I like the simplicity of no picture frame.

Of course soon it will be hanging in a nursery, not thrown into the leaf pile on this shelf.


25 September 2010

Sew Saturday - Capes

Back when I had more time (and only one child), I sold these capes on my etsy shop.

I make these similar to the way I make the bibs, except there is no batting between the fabric, and I use about a yard of fabric (of each color).


The fun part is deciding what to applique on each side of the cape. This cape was called "flower power".
I use spray adhesive to adhere the shape before zig zag sewing it onto the cape.

This cape is a fuller version. I used about two yards and cut out a semi circle shape so the cape drapes over the shoulders.

You could also add a hood. Just sew two squares of fabric together (only sewing two of the four sides of the square), then sew it onto the neck of the cape.

You can make your child into any kind of superhero, princess, character, or crusader you dream up.
Here are some of my other favorites:


I use snap or ties to hold the cape in place. The snap option is better on my mommy conscience...no strangling.


This one was a shop favorite. I made a lot of these guys (not the cute red head...the pirate cape).


With Halloween on the horizon, capes are a must for any costume!
I am actually putting one on my dog this year...

22 September 2010

Bibs

These bibs are actually a rip off from my sister's etsy shop.
Hers are pieced and quilted and way cute.

I love these bibs because there is no Velcro to snag your clothes in the dryer, and they use up fabric scraps you may have crowding your workspace.

Plus they are made with love just for your little one to spill and stain!


Begin by laying two choice fabrics right side facing each other. Outline the shape and size of a bib you prefer. Do you like longer? Wider? Whatever fits the scrap you are using? (that's what influenced my bib sizes...)

Cut out the fabric, keeping them sandwiched together.

Lay a square of batting on top of your cut fabric.

Sew the fabric-fabric-batting sandwich together, allowing a .25 inch seam. Leave the top "neck" area open. This will be your raw edge.

Trim away the excess batting. Turn sandwich right side out. Ta Da!

Iron it flat, paying attention to the edges.

Machine quilt. Any pattern you like.

Make about 2-3 feet of bias tape. Click here for tutorial.
(All the tutorials I found are WAY more complicated than what I do. Perhaps I will show how I do bias tape someday.)

Center and sew your bias tape onto the raw edge of your bib. Knot the ends.

Don the bib onto your baby. Don't be too sad when your creation gets stained.

brother's side...

sister's side...


I don't actually tie them into a knot or bow around their necks. I just wind the ties around each other a couple of times. It stays put, but comes off easy when lunch time is done.

I made lots and lots so I never run out before laundry day.

17 September 2010

Fairy Tale Book

This summer the gals in my family had a fabric swap. This is the scrap my sister mailed to us, and we all had to purchase fabric that complimented it.

Here is the color pallet we ended up with...
Also, my sister made a quilt out of some fairy tale fabric, and she gave me the scraps.

Like I said, my daughter already has too many blankets, so I decided to make a fairy tale book out of all my new fabric.

the cover


This is the inside cover and page one.

I started by sewing a border of yellow fabric (1 inch) around each of the fairy tale blocks.

Then I sewed a 2.5 inch border around each block on three sides.

Actually, I was planning on sewing the 2.5 border around all 4 sides of the blocks, but I had only cut enough to cover 3 sides.
Ugg. I hate backtracking when I am doing a project.

But then I realized that I like the asymmetrical look. And I liked the rectangular look better than a square one.

So I guess laziness led me to the final design.

And I like it.

The fun part came after the blocks were complete.
I made a mock book out of scraps of paper to help engineer the book. It served as a guide to indicate which block would be sewn to which block.

Each "page" is sewn to another page by its side and to its back. So eventually I had 5 page sets. Each page set has 4 fairytale blocks (front to back).
Yikes.
It's not as complicated as it sounds, as long as you follow your scrap-paper-mock-guide.

Each page has a layer of cotton batting between the fabric and is machine quilted. I didn't quilt over the fairytale picture though. I left that bordered instead.

The raw edge was only about 3 inches long. I then folded in those edges and sewed the whole page around the edge as a border. It hid the raw edge nicely.

My sewing machine and needle are not sturdy enough to just sew squack down the middle of 5 layers, so I pondered on how to bind the pages together.

After a day or sew so of thinking, I realized I only needed to sew one page set to one page set . Then sew another page to another page. Soon all the page sets were sewn to one another.

There are no words in the book. I will leave that to her imagination.