29 November 2010

Ornament Christmas Wreath

Here's a simple, easy and cheap wreath for ya! I stole this idea from Meghanne who stole it from Pottery Barn. It cost me about $7 and took about 20 minutes to make! YAY!

Supplies: green wreath (you can get these CHEAP at a thrift store-got mine for $4-just strip of the old decor), ornaments of your choice (got mine at the dollar store-5 for $1! Walmart had some too). Fishing line or floral wire.
Sidenote: I tried the fishing line first but it kept breaking and it was hard to tie. So I used some floral wire that I had from pulling apart my 80's thrift store wreath. You could even use green twisty ties. I found this alot easier.

How to: This is soooo simple and very self-explanatory but I'll go ahead and tell ya...
group together as many ornaments as you like. I loved these ones from the dollar store because they were all glittery! I did clusters of 3 and then a few little random ones, you really can do it however you like. Loop the ornaments through the wire/fishing line and twist/tie around the back. That's really it. Add as much as you like! Simple and easy peasy!

Final product.

How it looks on the door! I REALLY like this alot and even the hubs said it looked great so that has to say something...

How's the holiday decorating coming along?

27 November 2010

Baby Food Jar Christmas Tree

My friend and I made these a little while ago because I needed to do something with all those baby food jars! Really it's because I saw the idea here and thought that I had to try it. We followed her directions with just a couple changes: 1- we used liquid nails and super glue for the ribbon 2- we just put lights in the jars and no garland and 3...
we used strands of 100 lights and shoved 6 or 7 lights in each jar. We had to have bigger holes in the lids, but we think it looks so pretty when we plug it in! So we say thumbs up to more lights.

24 November 2010

Ranch Cheeseball Recipe

I got this recipe from my friend, Meghanne (my avid crafting buddy and author on this blog) and as I was making it for tomorrow as a little munchie...I thought I'd share it will my blogging buds. Its really, really yummy, super unhealthy and perfect for the holidays! :)

Ranch Cheeseball
2 packages of creme cheese at room temperature (use real creme cheese)
1 package Ranch dressing mix (the powder kind by Hidden Valley)
about a half handful of cheddar cheese
1-2 green onions, chopped

Blend the creme cheese to get it soft then add in the rest of the ingredients. Let it set over night to get the flavors going and top with more cheddar cheese and/or sliced almonds if you like. Serve with crackers of your choice!

Enjoy and have a super Thanksgiving!

Serious Last Minute T-Day Craft

If you haven't made a centerpiece for your Thanksgiving table yet-don't worry! These took me about 15 minutes to make(including the spray paint drying) and they are really pretty and simple.

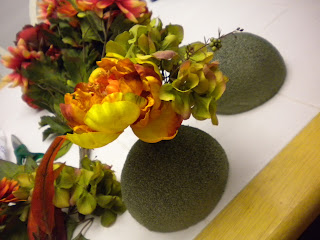
Supplies: round styrofoam ball about the size of a cantelope, 2 bunches of fake floral (Hobby Lobby 80% off!), wire cutters or strong scissors and acrylic or spray paint preferably in green.

Tutorial:
Cut your Styrofoam ball in half

Spray paint or paint green to camouflage the ball a bit.

Cut your flowers off the main stem and stick into the ball. This takes about 2 minutes. Just make sure you keep them close so you can't see through the bunch. Also, I saved all the leaves to trim around the bottom of the ball and for filler.

*sorry the lighting is so bad in this pic, our camera will make things yellow sometimes-ugh, I hate it*
BAM! Final product. I found that plate at a thrift store. I was going to use it to serve but thought this was cuter. Used vinyl and my Silhouette-thanks Silhouette!
Here's my second one. I actually got this idea from the TV show 'One Tree Hill'. Ha. They had these with peachy roses and placed them on a cake stand like this. Cute huh? Tried to find fake roses but they didn't have any(cheap) so I settled with the fall florals. I really like how they turned out and will probably use (and modify) for years to come. 
Very cheap and simple!

Have a WonDerFUl Thanksgiving!

*Okay, side story about this table clothe. I bought just one at the time and then realized I needed 2. So I went to 3 different Kohl's to find it and at the last stop, I'm frantically searching......! I was looking in this one section and then went to another and wasn't paying attention much and didn't notice the lady next to me until I see she is holding the exact table clothe I needed-the LAST matching one! I secretly followed here around for a bit seeing if she would set it down but she never did---talk about luck! If I had just been there 5 minutes earlier I might have got it!!! AH! Why must I be so type-a?*

20 November 2010

Dilemha...ah!

This isn't an emergency or anything...but I was blogging yesterday and noticed that another blog that I regularly visit has a 'drab to fab' day, in those exact words. I don't wanna be a copy cat...and really, the copying wasn't intentional at all! Erk. 

Anywho...I still wanna have a day where we post how we make something not so pretty to something...well, pretty. Any cute, catchy name for it? Leave a comment.


TieR sKirT


I wanted to post a super easy tier skirt for sew Saturday.  I am sure there are different ways to make one, but here's how I did it.  I cut out my fabric by measuring my daughter's waist and adding about an inch and a half for seem allowance and comfort.  I then made each tier 2 inches longer(you can make it even longer for a more gathered look).  I gathered the longer tier to match the shorter one.  I put right sides together and sewed.  I just did the same for the rest of it.  The bottom tier I folded the fabric in half and than gathered it and sew it together which made a more ribbon look on the last tier and I didn't have to do a hem which I hate for some reason.  Sorry I don't have pictures of the process.  Super Easy. Super cute.  I used about 1/4 yard of 3 different fabrics for a size 5 skirt. Looks super cute on.


15 November 2010

Drab to Fab: Bathroom Redo

 Our house doesn't need much re-doing (thank goodness!) but there are a few little things that need updating...which is fun! So, this past week I worked on giving our bathroom a little more personality and had to get rid of those horrible sliding doors to our shower.
See here: 
I had taken the doors off before I remembered to take a picture and there was no way I was going to put them back on! So use your imagination.

There was a big mirror on this wall (imagine this too) that took up the whole wall. I liked it at first but then after a while it got kinda old, and we decided to put up a smaller, framed mirror.


This is the bathroom in our bedroom, see the big mirror (and the mess)? Imagine this lined in black in the other bathroom. Not bad, but a little outdated. This bathroom/our bedroom is my next project-ha...whenever I get to it!

Final Pictures:
Put up a fun and funky shower curtain found on amazon.com (the room was already painted red when we bought the house---loved it).


Add in the framed mirror and a few little touches. This isn't the biggest bathroom so there isn't much room for loads of decorations.

This is a super easy craft. I took an old frame and cut out some vinyl with my Silhouette, applied it to the glass, left the back of the frame out, hot glued some ribbon on...and done! Got the idea from Hobby Lobby.

14 November 2010

Monster birthday invites.

Our little guy's first birthday is coming up. We are having a monster carnival. These are the invites. I wanted to do something that would include all our friends, older and younger. We are going to play games in our garage. I plan on posting more as we set up for the party this weekend. I'm so excited (and I think our little man is, too.)

13 November 2010

Tangerine Fall Decor

Here is a quick and easy little decor idea. I found the glass globe at a thrift store (best place for stuff like that) and the bottom is actually a candlestick that was this nasty forest green color. I spray painted that and then hot glued the globe to the top of the candlestick. Then I added some tangerines, little wicker balls and acorns to the globe. I love this thing because I can change it out whenever I want. 


Easy peasy. PS. That print that is in the frame there (I change this out a bit too) is from this blog, it was free last week. Sorry should have told you guys. But she does have some more cute prints here on her Etsy shop-really cute stuff. 

<br /> <center><a href="http://www.alittlelovelyblog.blogspot.com"><img src="http://i260.photobucket.com/albums/ii23/jmuaina/saturdaysoireebutton-2.jpg" border="0" alt="Photobucket" /></a></center><br /> 

<a            border="0"           href="http://tatertotsandjello.blogspot.com"                target="_blank"><img                    src="http://hadfield.smugmug.com/photos/825895175_xmTVA-O.jpg"                   alt="Join  us Saturdays at tatertotsandjello.com for the weekend      wrap    up           party!"  /></a><br  /> 

12 November 2010

Book Wreath...

Super CUTE and really cheap to make!!
she gives a step by step direction for a magazine tutorial that she did!
I got my book at the goodwill for 2 dollars, wreath at the dollar store, Laura
had the brown ink pad, and we both had glue guns
 my wreath isn't as full as the one she made but thats the beauty of making something that you can't mess up
and you can interpret it the way you want it to look!
I also did not add a ribbon....I like it hanging on the back of my door instead!
 Hope you all can find the time to make one! It adds character to your home
(takes up some serious time to do but worth it)
HAPPY CRAFTING

Sew Saturday: Re-Vamp Your Curtains!

**Ha, hope we can all laugh at this...if I'm not super late, I'm early! Totally thought today was Saturday.* :)

I did these a while ago with my mother in law when she was in town, but finally remembered to post about it!
These are really easy, but take a bit of time and measuring.

Supplies: curtains of your choice and 1 yard fabric of you choice.

How to: Cut your fabric the length of the curtain and measure how wide you want it and cut that as well (I did these 14 inches wide). Iron down edges to create a seam, pin down onto the curtain making sure you keep the fabric level (we did this by using a measuring tape, setting it to 16 inches from the top and measuring every few inches across to make sure was all even), then sew along the edges--told you it was easy. The hardest part is making sure everything is level and doesn't pucker when you sew. Finished product:
They really do add a little "spice" to our living room.

Close up picture. You can place the fabric ANYWHERE on the curtain and pick out when this gets old and you want something new (I even thought of using an iron on and then sewing the seam but my mother in law said it might be nice to be able to pick out and change if I wanted). My mom has a few in her house where she actually cut the curtain and sewed fabric in between to adds length to the curtain. She added the fabric about 12 inches from the bottom of the curtain and that looks really cute too. 

Happy Sewing...and enjoy your Saturday!

09 November 2010

Drab to Fab: Reupholstered Rocker


Just after we told my parents we were expecting, they gave us this beautiful rocker. It's super nice, but I wasn't crazy about the light colored fabric. We had it in our house for a few weeks and it already started looking dirty.

With my mom's blessing, I set my mind on recovering it, and it turned out pretty dang cool. This baby was tons of work! I love the brown corduroy though, I think it will hold up much better.


I found an amazing tutorial here. I basically seam-ripped all the covers open and used the original fabric as patterns. This way, I got a nice tight fit. I used a washable pencil to outline, then cut it out with my rotary cutter.


The hardest part was keeping the original snaps in tact. For the arm pieces, I just kept the original cushions and made slip covers for them. Then I made slits for the snaps and tacked them in place. 

There was a lot of hand needlework too. Especially the main back cushion. I had to blind stitch all the cushions closed. I'm really good at my blind stitch now.

The foot rest was easy (peasy). Just broke out my handy staple gun and pulled the edges tight.


So pretty. 
A beast to finish, but pretty.

08 November 2010

Drab to Fab: Painted Fake Flowers

I've heard of people buying old flower-y wreaths at thrift stores, spray painting them completely and re-vamping them so when I saw this cute this bundle of flowers I instantly thought---RE DO!

Here is the before pictures. The "vase" was a peachy color and the flowers were white with hot pink splotches. Yikes! Yeah, that's my little boy in the background-ain't he cute?

The finished product. I painted the vase an antique white and the flowers a honey dew melon green. To cover the flowers I had to use a hearty amount of paint and dab it on with a sponge brush. It covered well and turned out super cute! 

04 November 2010

Leaf Luminary

I got this idea from Martha Stewart's magazine--her most recent one.
It is sooo easy and took me about 5 minutes to do.
Below is the supplies needed: glass container (got mine at the $1 store), spray adhesive (a crafter' must have) and some fresh fall leaves.

How to: Spray the back of the leaves with the adhesive on a paper towel and apply to the glass just so a little bit of the bottom is hanging. Overlap the leaves if you like. Trim the bottom. And...that's it. Place a candle inside and you are good to go!


Soooooo easy peasy!
Happy Fall!
*Yes, its still Fall---Christmas is still 2 months away, so don't get too excited yet.*

01 November 2010

Happy Halloween...

...from Jensen Family Farms. :)
(We're peapods and Aidan's a farmer)
(I wish we would have thought of an office reference like someone said. We could have been beets.)